# Deploy JPetStore in Digital Ocean

<!-- wp:paragraph -->
<p>JPetStore is one of the best applications to learn performance testing and engineering concepts. In this blog post, we will see how to deploy JPetStore in Digital Ocean.  </p>
<!-- /wp:paragraph -->

<!-- wp:generateblocks/headline {"uniqueId":"c6ade9e6"} -->
<h2 class="gb-headline gb-headline-c6ade9e6 gb-headline-text">What is JPetStore?</h2>
<!-- /wp:generateblocks/headline -->

<!-- wp:paragraph -->
<p>JPetStore is a sample demo application to know about how to use Spring with a full web application server. It is built on top of MyBatis 3, Spring 5, and Stripes.</p>
<!-- /wp:paragraph -->

<!-- wp:paragraph -->
<p>Here is the <a href="https://github.com/mybatis/jpetstore-6" target="_blank" rel="noreferrer noopener">GitHub repo</a>.</p>
<!-- /wp:paragraph -->

<!-- wp:paragraph -->
<p>You can run JPetStore on TomCat, Jetty, Glassfish, and more.</p>
<!-- /wp:paragraph -->

<!-- wp:generateblocks/headline {"uniqueId":"e0a7ce93"} -->
<h2 class="gb-headline gb-headline-e0a7ce93 gb-headline-text">How to run it locally?</h2>
<!-- /wp:generateblocks/headline -->

<!-- wp:paragraph -->
<p>Clone the <a href="https://github.com/mybatis/jpetstore-6" target="_blank" rel="noreferrer noopener">repo</a> to your local and follow the below steps.</p>
<!-- /wp:paragraph -->

<!-- wp:code -->
<pre class="wp-block-code"><code># clone the repo
git clone https://github.com/mybatis/jpetstore-6

# build war file
cd jpetstore
./mvnw clean package

# deploy
./mvnw cargo:run -P tomcat90</code></pre>
<!-- /wp:code -->

<!-- wp:paragraph -->
<p> Then, launch http://localhost:8080/jpetstore</p>
<!-- /wp:paragraph -->

<!-- wp:image {"align":"center","id":9547,"sizeSlug":"large","linkDestination":"media"} -->
<figure class="wp-block-image aligncenter size-large"><a href="https://qainsights.com/wp-content/uploads/2022/07/image.png"><img src="https://qainsights.com/wp-content/uploads/2022/07/image-1024x495.png" alt="JPetStore" class="wp-image-9547"/></a><figcaption>JPetStore</figcaption></figure>
<!-- /wp:image -->

<!-- wp:generateblocks/headline {"uniqueId":"3f4e2699"} -->
<h2 class="gb-headline gb-headline-3f4e2699 gb-headline-text">How to run it as a Docker container?</h2>
<!-- /wp:generateblocks/headline -->

<!-- wp:paragraph -->
<p>The above steps are too many. But by leveraging Docker, you can start JPetStore in one command. The prerequisite is to have Docker installed in your local. </p>
<!-- /wp:paragraph -->

<!-- wp:paragraph -->
<p>Issue the below command which will start the JPetStore app.</p>
<!-- /wp:paragraph -->

<!-- wp:paragraph -->
<p><code>docker run -p 8080:8080 -d qainsights/jpetstore</code></p>
<!-- /wp:paragraph -->

<!-- wp:paragraph -->
<p>Then, launch http://localhost:8080/jpetstore</p>
<!-- /wp:paragraph -->

<!-- wp:generateblocks/headline {"uniqueId":"dbd02d09"} -->
<h2 class="gb-headline gb-headline-dbd02d09 gb-headline-text">How to deploy it on Digital Ocean?</h2>
<!-- /wp:generateblocks/headline -->

<!-- wp:paragraph -->
<p>Sometimes, running an app locally also might be not comfortable. Let us move the application to the cloud. Digital Ocean offers various affordable plans and exciting features to deploy and manage apps. There are many ways to deploy JPetStore: using a droplet or by leveraging Apps where you can deploy it from Docker Hub. DO registry, or from your GitHub repo.  </p>
<!-- /wp:paragraph -->

<!-- wp:paragraph -->
<p>Just to keep the process simple, let us deploy it from Docker Hub.</p>
<!-- /wp:paragraph -->

<!-- wp:paragraph -->
<p>Sign up for a <strong>free Digital Ocean account</strong> using <a href="https://qain.si/do" target="_blank" rel="noreferrer noopener">this link</a> where you get free $100 60-day credits.</p>
<!-- /wp:paragraph -->

<!-- wp:generateblocks/button-container {"uniqueId":"ad2bd0c6","alignment":"center","isDynamic":true,"blockVersion":2} -->
<!-- wp:generateblocks/button {"uniqueId":"05ddc635","hasUrl":true,"target":true,"backgroundColor":"var(\u002d\u002dglobal-color-8)","backgroundColorHover":"#222222","textColor":"#ffffff","textColorHover":"#ffffff","paddingTop":"15","paddingRight":"20","paddingBottom":"15","paddingLeft":"20","gradientDirection":90,"gradientColorOne":"rgba(255, 255, 255, 0.1)","gradientColorTwo":"rgba(0, 0, 0, 0.30)","blockVersion":2} -->
<a class="gb-button gb-button-05ddc635 gb-button-text" href="https://qain.si/do" target="_blank" rel="noopener noreferrer">Free $100 Digital Ocean Credits</a>
<!-- /wp:generateblocks/button -->
<!-- /wp:generateblocks/button-container -->

<!-- wp:paragraph -->
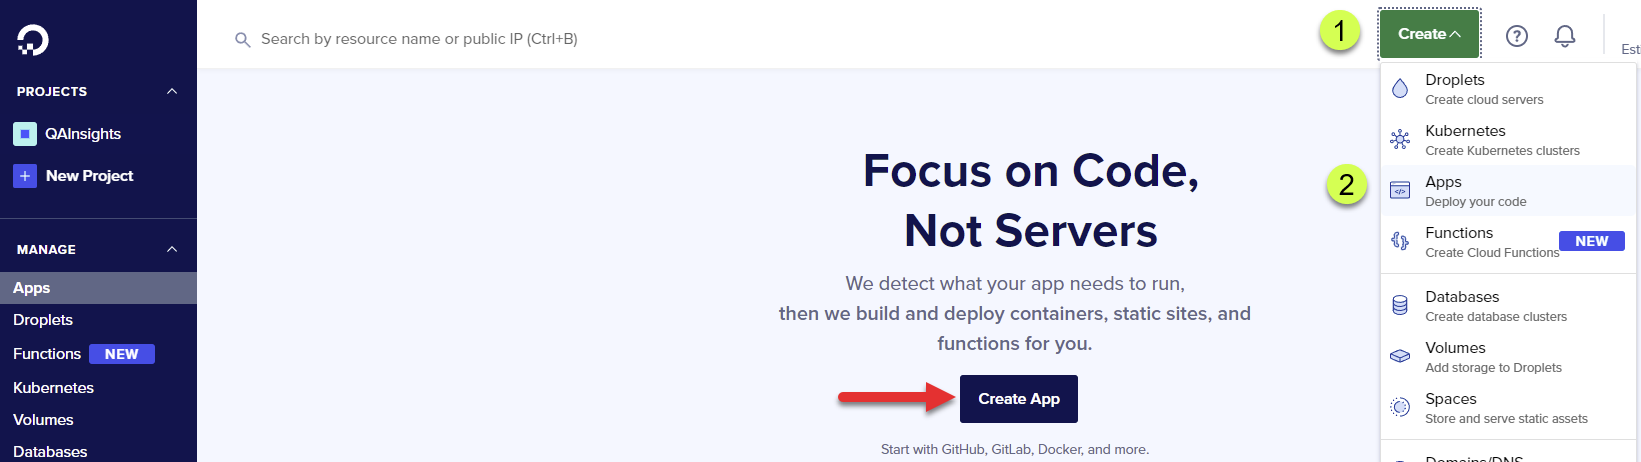
<p>Then, navigate to <strong>Apps &gt; Create App </strong>or go to <strong>Create &gt; Apps</strong> as shown below.</p>
<!-- /wp:paragraph -->

<!-- wp:image {"align":"center","id":9549,"sizeSlug":"large","linkDestination":"media"} -->
<figure class="wp-block-image aligncenter size-large"><a href="https://qainsights.com/wp-content/uploads/2022/07/image-1.png"><img src="https://qainsights.com/wp-content/uploads/2022/07/image-1-1024x288.png" alt="Deploy JPetStore in Digital Ocean" class="wp-image-9549"/></a><figcaption>Deploy JPetStore in Digital Ocean</figcaption></figure>
<!-- /wp:image -->

<!-- wp:paragraph -->
<p>In the <strong>Resources </strong>page, click <strong>Docker Hub</strong>, then enter <code>qainsights/jpetstore</code> in the <strong>Repository </strong>text field, and then click on the <strong>Next </strong>button as shown below. </p>
<!-- /wp:paragraph -->

<!-- wp:image {"align":"center","id":9550,"sizeSlug":"large","linkDestination":"media"} -->
<figure class="wp-block-image aligncenter size-large"><a href="https://qainsights.com/wp-content/uploads/2022/07/image-2.png"><img src="https://qainsights.com/wp-content/uploads/2022/07/image-2-1024x742.png" alt="Create Resource from Docker Hub" class="wp-image-9550"/></a><figcaption>Create Resource from Docker Hub</figcaption></figure>
<!-- /wp:image -->

<!-- wp:paragraph -->
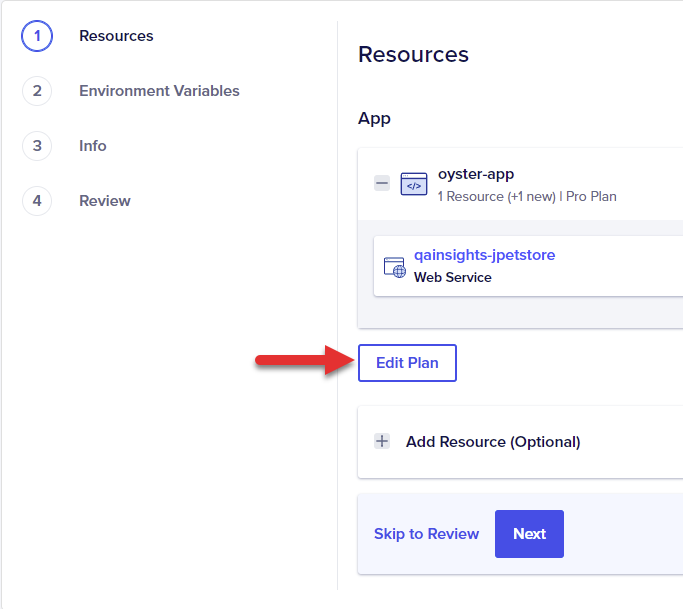
<p>The next step is to select a plan to fit our needs. Click <strong>Edit Plan</strong> as shown below.</p>
<!-- /wp:paragraph -->

<!-- wp:image {"align":"center","id":9551,"sizeSlug":"full","linkDestination":"media"} -->
<figure class="wp-block-image aligncenter size-full"><a href="https://qainsights.com/wp-content/uploads/2022/07/image-3.png"><img src="https://qainsights.com/wp-content/uploads/2022/07/image-3.png" alt="Edit Plan" class="wp-image-9551"/></a><figcaption>Edit Plan</figcaption></figure>
<!-- /wp:image -->

<!-- wp:paragraph -->
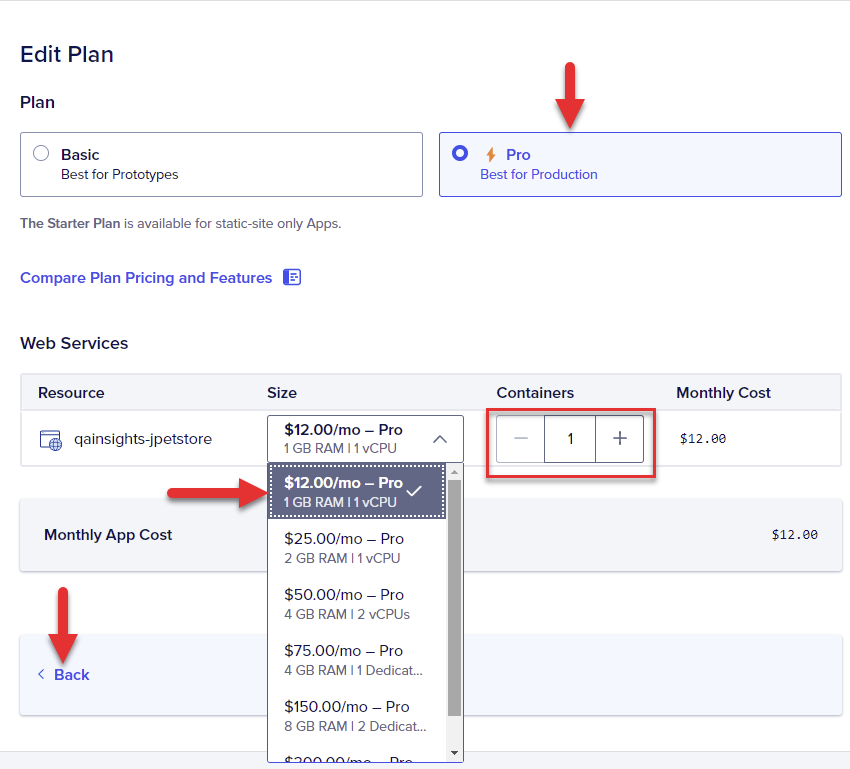
<p>Select the <strong>Pro</strong> plan and choose the desired size as shown below. Just to keep our costs low, let us choose a $12/month plan which has 1 GB RAM and 1 vCPU power. Then click <strong>Back</strong>. </p>
<!-- /wp:paragraph -->

<!-- wp:image {"align":"center","id":9553,"sizeSlug":"full","linkDestination":"media"} -->
<figure class="wp-block-image aligncenter size-full"><a href="https://qainsights.com/wp-content/uploads/2022/07/image-5.png"><img src="https://qainsights.com/wp-content/uploads/2022/07/image-5.png" alt="Select Plan" class="wp-image-9553"/></a><figcaption>Select Plan</figcaption></figure>
<!-- /wp:image -->

<!-- wp:paragraph -->
<p>Then follow the on-screen prompt instructions till you reach the last screen where you can review the configuration. Then click the <strong>Create Resources </strong>button.</p>
<!-- /wp:paragraph -->

<!-- wp:paragraph -->
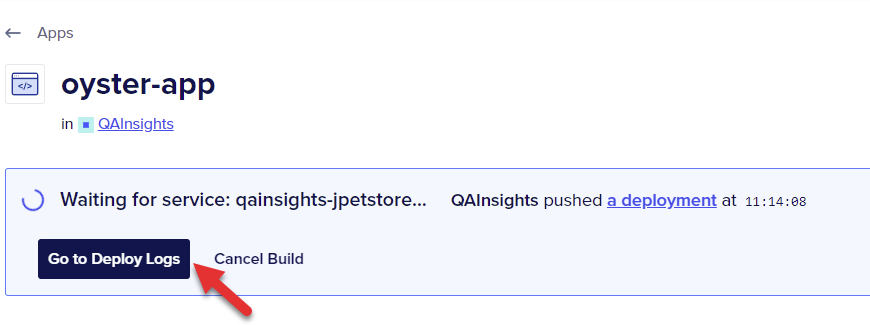
<p>Click the <strong>Go to Deploy Logs</strong> button as shown below to monitor the logs.</p>
<!-- /wp:paragraph -->

<!-- wp:image {"align":"center","id":9554,"sizeSlug":"full","linkDestination":"media"} -->
<figure class="wp-block-image aligncenter size-full"><a href="https://qainsights.com/wp-content/uploads/2022/07/image-6.png"><img src="https://qainsights.com/wp-content/uploads/2022/07/image-6.png" alt="Deploy Logs" class="wp-image-9554"/></a><figcaption>Deploy Logs</figcaption></figure>
<!-- /wp:image -->

<!-- wp:paragraph -->
<p>Within a minute, Digital Ocean will give a public endpoint as shown below.</p>
<!-- /wp:paragraph -->

<!-- wp:image {"align":"center","id":9555,"sizeSlug":"full","linkDestination":"media"} -->
<figure class="wp-block-image aligncenter size-full"><a href="https://qainsights.com/wp-content/uploads/2022/07/image-7.png"><img src="https://qainsights.com/wp-content/uploads/2022/07/image-7.png" alt="Live App" class="wp-image-9555"/></a><figcaption>Live App</figcaption></figure>
<!-- /wp:image -->

<!-- wp:paragraph -->
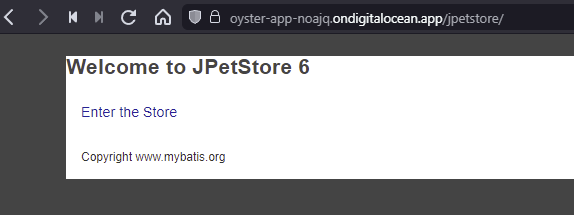
<p>To launch the application, append <code>jpetstore</code> to the URL e.g. https://oyster-app-noajq.ondigitalocean.app/jpetstore</p>
<!-- /wp:paragraph -->

<!-- wp:paragraph -->
<p>Digital Ocean will automatically provision your URL with TLS certificates. How cool is that? </p>
<!-- /wp:paragraph -->

<!-- wp:image {"align":"center","id":9556,"sizeSlug":"full","linkDestination":"media"} -->
<figure class="wp-block-image aligncenter size-full"><a href="https://qainsights.com/wp-content/uploads/2022/07/image-8.png"><img src="https://qainsights.com/wp-content/uploads/2022/07/image-8.png" alt="JPetStore on Digital Ocean" class="wp-image-9556"/></a><figcaption>JPetStore on Digital Ocean</figcaption></figure>
<!-- /wp:image -->

<!-- wp:paragraph -->
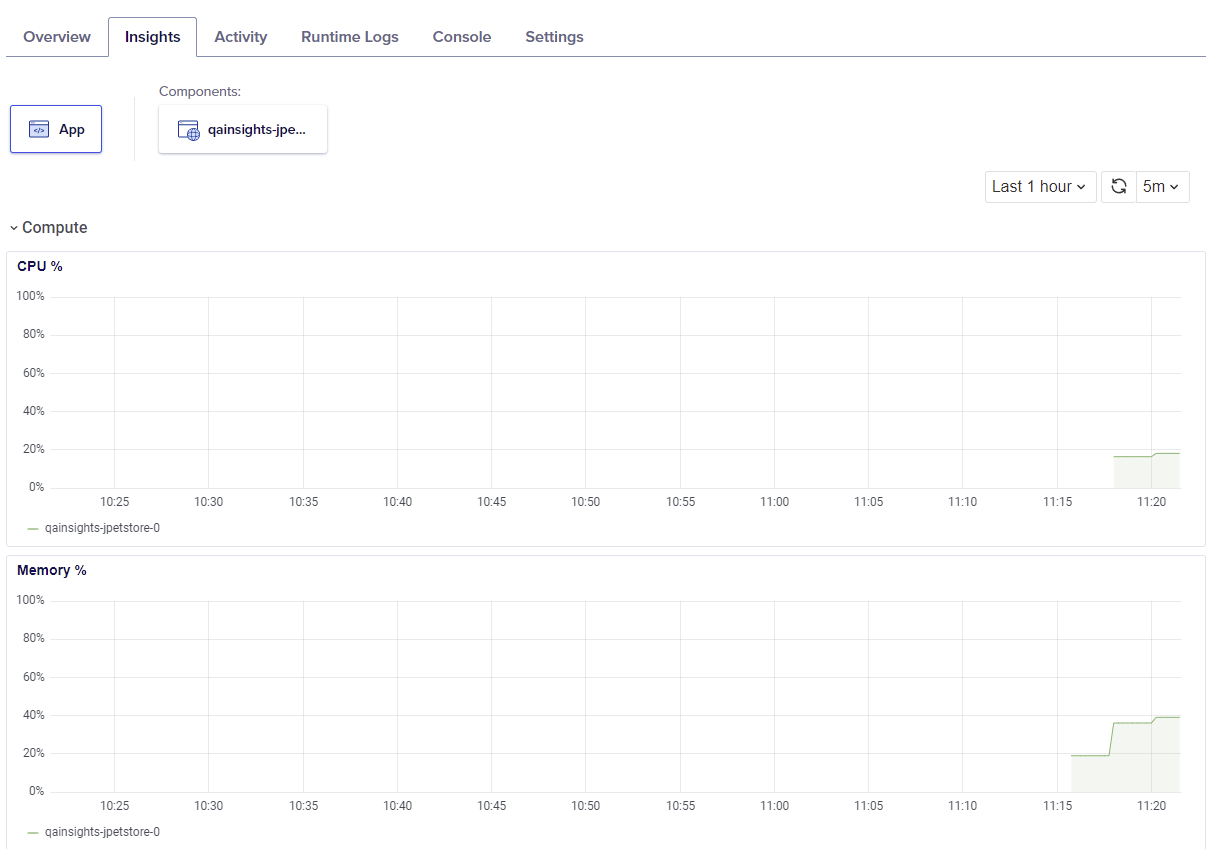
<p>Suppose if you are running a simple load test (please do not throw more load, and it would be ideal to inform Digital Ocean team before you attempt high volume load test and make sure you do not get surprise billing at the end of the month), the Digital Ocean <strong>Insights </strong>tab helps you to monitor the CPU, Memory, and more.</p>
<!-- /wp:paragraph -->

<!-- wp:image {"align":"center","id":9557,"sizeSlug":"large","linkDestination":"media"} -->
<figure class="wp-block-image aligncenter size-large"><a href="https://qainsights.com/wp-content/uploads/2022/07/image-9.png"><img src="https://qainsights.com/wp-content/uploads/2022/07/image-9-1024x718.png" alt="Insights " class="wp-image-9557"/></a><figcaption>Insights </figcaption></figure>
<!-- /wp:image -->

<!-- wp:generateblocks/headline {"uniqueId":"180c044d"} -->
<h2 class="gb-headline gb-headline-180c044d gb-headline-text">How to destroy the resources?</h2>
<!-- /wp:generateblocks/headline -->

<!-- wp:paragraph -->
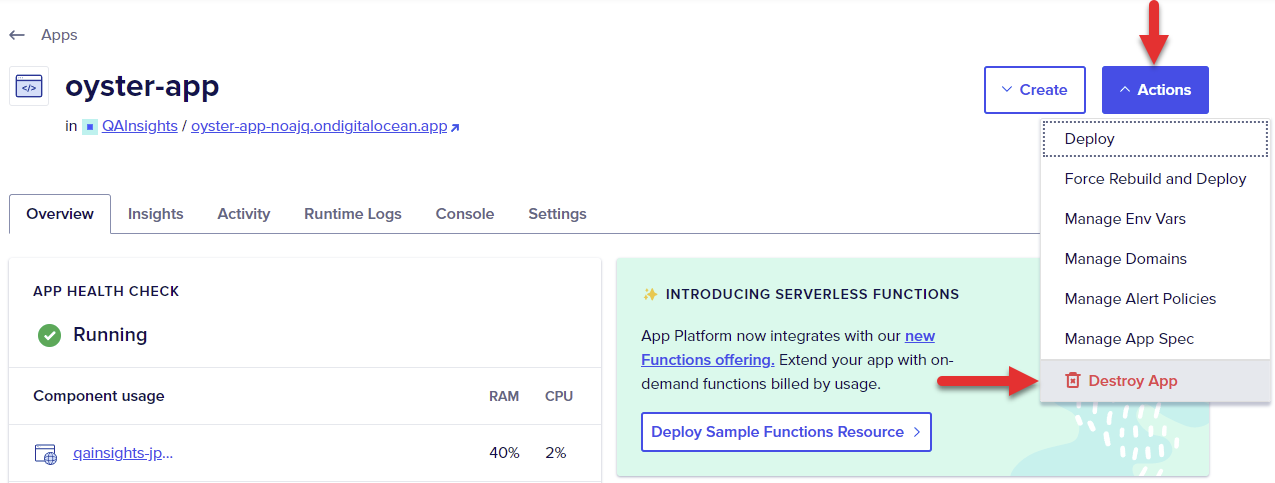
<p>Once you are done with your learning, you may no longer need the app to be up and running. To destroy the resources, go to <strong>Actions &gt; Destroy App </strong>as shown below.</p>
<!-- /wp:paragraph -->

<!-- wp:image {"align":"center","id":9560,"sizeSlug":"large","linkDestination":"media"} -->
<figure class="wp-block-image aligncenter size-large"><a href="https://qainsights.com/wp-content/uploads/2022/07/image-10.png"><img src="https://qainsights.com/wp-content/uploads/2022/07/image-10-1024x388.png" alt="Destroy the resources" class="wp-image-9560"/></a><figcaption>Destroy the resources</figcaption></figure>
<!-- /wp:image -->

<!-- wp:paragraph -->
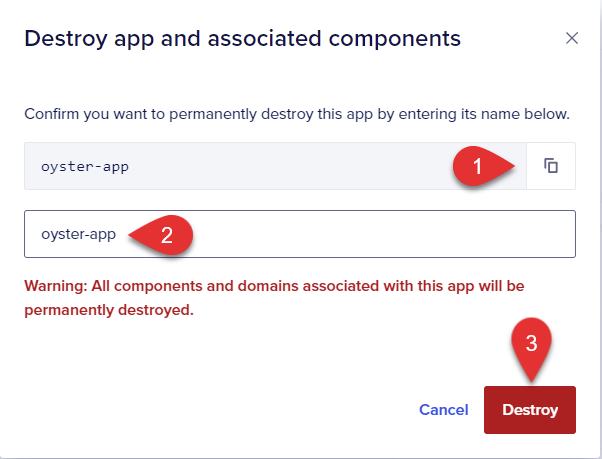
<p>Follow the prompts to destroy the resources. This action is irreversible.</p>
<!-- /wp:paragraph -->

<!-- wp:image {"align":"center","id":9561,"width":602,"height":459,"sizeSlug":"full","linkDestination":"media"} -->
<figure class="wp-block-image aligncenter size-full is-resized"><a href="https://qainsights.com/wp-content/uploads/2022/07/image-11.png"><img src="https://qainsights.com/wp-content/uploads/2022/07/image-11.png" alt="Destroy" class="wp-image-9561" width="602" height="459"/></a><figcaption>Destroy</figcaption></figure>
<!-- /wp:image -->

<!-- wp:generateblocks/headline {"uniqueId":"daf76293"} -->
<h2 class="gb-headline gb-headline-daf76293 gb-headline-text">Final Thoughts</h2>
<!-- /wp:generateblocks/headline -->

<!-- wp:paragraph -->
<p>As we learned, spinning up a demo application is easy in Digital Ocean and affordable. You can learn performance testing and engineering concepts and run a small realistic load testing in your own box  and monitor the CPU, Memory, and other resources without setting up any other components. </p>
<!-- /wp:paragraph -->

<!-- wp:paragraph -->
<p>Happy Performance Testing!</p>
<!-- /wp:paragraph -->